


Week 2 Smoke Damaged House Renovation - Salvaging Doors, Removing Stucco Ceilings & Our $50 Accent Wall
Updated: Oct 1
Some renovation weeks look incredibly productive.
Walls come down. Flooring goes in. Rooms suddenly look completely different.
And then there are weeks where you spend hours cleaning old doors, making design decisions, ordering materials, and starting projects that won't actually look impressive until weeks later.
This was one of those weeks.
Week two of our DIY home renovation didn't bring a dramatic before and after, but looking back, we made some pretty important progress—including finally starting to erase one of the biggest reminders of the home's previous life: The smoke damage.
Trying to Save Our Smoke-Stained Doors
I started the week by removing all of the interior doors and trim so I could clean and prep everything before the painter got started.
One of my biggest goals with this renovation was keeping costs as low as possible, which meant reusing as many of the home's existing features as we could.
Even the doors.
Were they my favourite style?
Absolutely not.
They're dated, just like the trim, but replacing every interior door and all of the trim would have added another significant expense to an already growing renovation budget.
So I decided to see what a very thorough cleaning and some fresh paint could accomplish first.
Cleaning the doors was oddly satisfying because you could literally watch years of smoke residue run down them.
Some cleaned up much better than others, and it was pretty obvious which doors had been in the heaviest-smoking areas of the house. Thankfully, most of them were still salvageable.
Even the primer made an unbelievable difference.
Once they're completely painted, I'm optimistic we'll have successfully dragged them a little closer to the 21st century.
And we'll have done it without paying to replace every door in the house. I'll take that as a win.
Making a Renovated House Feel Like Our House
Somewhere during the design process, I decided I wanted the finished house to look like a new build.
You know... Clean. Bright. New.
Basically, a cookie-cutter house.
Except apparently I don't actually want a cookie-cutter house because I also decided every room needed something a little different and personal.
Classic Brittany.
My plan became to give each space at least one feature that made it feel custom.
I already had ideas brewing for the upstairs bathroom, the girls' bedroom, and our main living space.
And because the living room, dining room, and kitchen would hopefully become one completely open space, I wanted something that would visually define the dining area.
Enter: the accent wall.
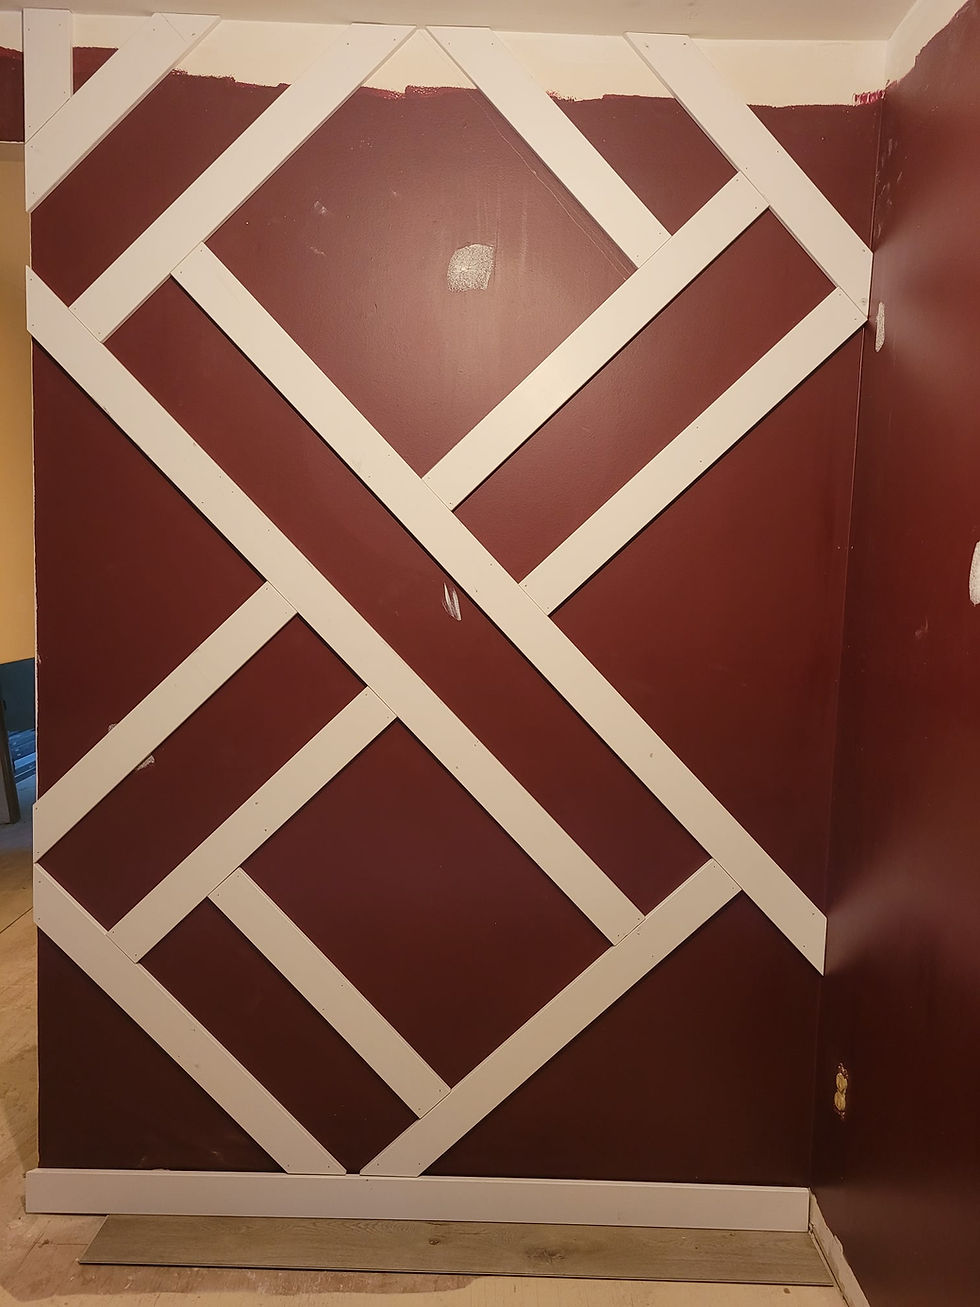
Building Our DIY MDF Accent Wall
Because I was planning an almost completely white kitchen, I wanted the dining room to bring some colour and texture into the main living area.
Naturally, that meant several hours on Pinterest researching DIY accent wall ideas.

I quickly discovered that there are basically no rules.
Geometric patterns, straight lines, boxes, abstract designs... Anything goes.
I kept gravitating toward the more abstract designs, so after approximately 7,842 adjustments to my plan, I headed to the hardware store.
I used 3.5-inch by 8-foot MDF strips for the design. Buying pre-cut strips made the project faster, although you could save more money by buying a larger sheet of MDF and ripping it into strips yourself.
The funny part?
Actually cutting and installing the MDF wasn't what took forever.
It was the tape.
I taped the entire design onto the wall first so I could see the pattern before making anything permanent. (Keep in mind this was pre-ChatGPT).
Then I moved a piece.
Then another.
Then moved the first one again.
And probably repeated that process several hundred times.
Once I was finally happy with the layout, we cut the MDF and nailed everything into place.
Suddenly, one of the plainest walls in the house had personality.
DIY Accent Wall Tip: If I were doing this project again, I'd caulk along the edges of the MDF before painting. Our painter got to it before I did, but sealing those little gaps creates a more finished look and prevents dust from collecting behind the boards.
A Million Tiny Renovation Projects Durng A DIY Home Renovatons
I have a terrible habit of bouncing between projects during renovations.
Instead of finishing one room from beginning to end, I'll start something...
Notice something else...
Walk into another room...
And somehow begin an entirely different project.
It can make it feel like we're accomplishing absolutely nothing even when we've been working all day.
After finishing the accent wall, we tackled a bunch of smaller jobs around the house, including removing old bathroom vanities and the washing machine.
One unexpected perk was discovering that people actually wanted some of the things we were removing.
Thanks to Facebook Marketplace, I was able to sell several existing features from the house and put a little money back into our renovation budget.
Reduce, reuse, recycle... And recoup some renovation expenses while you're at it.
Making Some Big Design Decisions
Not all renovation progress involves power tools.
Sometimes making a decision you've been agonizing over for weeks feels equally productive.

This week I finally decided on:
The size & location of the basement hallway
Chose the location for a closet in Grayson's room
Decided a second kitchen downstairs wasn't practical
Accepted that moving the laundry upstairs wasn't practical either
We even installed two new exterior light fixtures.
Was that the most exciting transformation? No.
But at least we weren't going to move those boxes around the house another hundred times.
Sometimes that's enough to make the small things feel like a win!
Goodbye, Stucco Ceilings!
Then came one of my favourite developments of the entire week.
Our painter, Kidd Paint Services, determined that instead of using specialty paint to cover the smoke damage on our textured ceilings, it would actually be more cost-effective to remove the stucco texture completely.
You did not have to ask me twice. I hated those ceilings.
I've never been a huge fan of textured ceilings in general, but stucco was particularly high on my list of things I wanted gone.
It's also practically impossible to clean.
I've watched Thalia eat berry-flavoured applesauce and somehow manage to get it on her high chair, the table, surrounding furniture, the floor AND the ceiling.
I need ceilings I can clean.
I hadn't even considered removing the stucco because I assumed it would be an unnecessary additional expense.
Finding out that removing it could actually save us money? Best renovation news ever.
The ceilings were scraped and painted that week, and the difference was incredible.
Of course, freshly painted ceilings also meant we couldn't create a bunch of dust inside.
So while the painter worked, I found myself outside installing lights and debating exterior paint decisions instead.
Current verdict? Black front window and screen door.
Thank you to everyone who voted and helped me make yet another renovation decision.
Fun fact: We never actually painted the front door or window, but we did take the screen door off which I think helped a lot. This is what the house looked like on closing day 👇🏻

Ordering My Dream Kitchen Without Blowing the Budget
The other major milestone this week was an expensive—but very exciting—one.
I finally ordered the kitchen cabinets.
Getting to this point had been unnecessarily stressful.
I'd already had my kitchen project cancelled twice by another installer and was starting to wonder whether the kitchen I wanted would actually fit within our renovation budget.
Then I found Castle Kitchens, a local cabinet supplier in London, Ontario.
They were able to supply the cabinets for approximately half the price I'd previously been quoted—and with a shorter timeline.
Suddenly my dream kitchen felt possible again! The cabinets were officially ordered and scheduled to arrive later in August.
I couldn't wait.
Looking Back: Progress Doesn't Always Photograph Well
At the end of the week, I remember feeling like we hadn't accomplished very much.
The house didn't look dramatically different.
There wasn't a big room reveal.
We weren't anywhere close to moving in.
But looking back, I realize how much important groundwork happened during this stage.
We salvaged doors instead of replacing them.
We removed smoke-damaged textured ceilings.
We added character with an inexpensive DIY accent wall.
We made major layout decisions.
We ordered the kitchen.
And we lined up projects that would completely transform the house over the coming weeks.

That's something I've learned over and over again through DIY home renovations: Progress doesn't always photograph well.
Although I do have to admit, seeing the before and after of cleaning the smoke damaged doors is pretty alarming, or impressive depending on how you look at it.
Sometimes the most important renovation weeks are the ones where you're cleaning, planning, ordering, prepping, and making a thousand tiny decisions that make the exciting transformations possible later.
And hopefully, as more primer and paint made its way onto those walls, we'd finally start replacing that lingering smoke smell with something much better: The smell of our home.
Follow Our DIY Home Renovation From the Beginning
Want to see how this renovation unfolded week by week? Catch up on the full story below—from getting the keys and tackling smoke damage to kitchen surprises, flooring, trim work, and finally seeing the house start to feel like home.
Missed all the before photos? Check out the blog post Semi Excited to see our starting point.
Whether you're planning your own DIY home renovation or just love a good before-and-after story, there's plenty more renovation chaos, lessons learned, budget decisions, and progress to come.
Curious what the entire renovation ended up costing us? I broke down our complete Willow Street home renovation budget, including what we spent, where the money went, how much we saved by DIYing, and what we ultimately made when we sold the house.
Frequently Asked Questions
Can you reuse doors in a smoke damaged house?
We were able to salvage most of ours by thoroughly cleaning, priming, and repainting them. Some doors had significantly more smoke residue than others, but reusing the existing doors helped us keep our renovation costs down.
Is an MDF accent wall expensive to build?
Ours was one of the more affordable custom projects we added to the house. We used pre-cut MDF strips to save time, although buying a full sheet of MDF and cutting your own strips can make the project even more budget-friendly. In total, the project cost around $50 plus paint which we already had on hand.
Can textured ceilings be removed after smoke damage?
In our case, yes. Our painter determined that removing the existing stucco ceiling texture was more economical than covering the smoke damage with specialty paint (which is very expensive). The right approach will depend on the ceiling materials, condition, and age of your home, so it's worth having a professional assess it first.
How can you save money during a home renovation?
Reusing existing materials was a big part of our strategy. We salvaged and repainted doors and trim, sold unwanted fixtures on Facebook Marketplace, incorporated secondhand finds, and looked for affordable alternatives before automatically buying everything new.


Comments